Battery switch on travel trailer function is crucial for managing your RV’s power. Understanding how your battery switch works—whether it’s a single-pole, double-pole, or double-pole double-throw type—is key to safe and efficient power usage. This guide will walk you through different switch types, safe connection procedures, troubleshooting common issues, and essential maintenance tips to keep your travel trailer’s power system running smoothly.
We’ll cover everything from correctly connecting and disconnecting your batteries to understanding how the switch interacts with other electrical components like solar panels and inverters. Proper battery management is vital for extending the life of your batteries and ensuring a comfortable and reliable experience on the road. Let’s dive in!
Troubleshooting Common Battery Switch Issues

Your travel trailer’s battery switch is crucial for managing power, and problems can leave you stranded. Understanding common issues and how to diagnose them can save you time and frustration. This section details common problems, diagnostic methods, and repair procedures.
Common Battery Switch Problems
Several issues can plague your travel trailer’s battery switch. Corrosion is a frequent culprit, building up on terminals and hindering electrical flow. Loose connections, either at the switch itself or the battery terminals, are another common problem, leading to intermittent power or complete failure. Finally, the switch itself might fail, requiring replacement. These issues can manifest as dead batteries, flickering lights, or complete power loss.
So, you’re planning a trip? Awesome! Don’t forget travel insurance! Check out Aon travel insurance for options covering everything from lost luggage to medical emergencies. Seriously, it’s a lifesaver. And if that site doesn’t quite fit the bill, another great resource for finding the right Aon plan is Aon travel insurance – they often have different packages and deals.
Compare and choose what best suits your needs and budget before you jet off!
Diagnosing Battery Switch Problems
Before attempting repairs, proper diagnosis is essential. This involves a combination of visual inspection and voltage testing. A systematic approach will help pinpoint the source of the problem.
| Step | Action | Expected Result |
|---|---|---|
| 1 | Visually inspect the battery switch and terminals for corrosion, loose connections, or damage. Look for any signs of melting or burning. | Corrosion will appear as a green or white powdery substance. Loose connections will be visibly loose or show signs of wear. Damage may be obvious cracks or breakage. |
| 2 | Check the battery cables for any breaks or damage. Ensure that the clamps are securely fastened to the battery terminals. | Clean, tight connections and undamaged cables. |
| 3 | Use a multimeter to test the voltage at the battery terminals. The reading should be close to 12.6V for a fully charged 12V battery. | A low voltage reading indicates a charging problem or a deeply discharged battery. A reading near 0V suggests a complete circuit break. |
| 4 | Test the voltage at the output side of the battery switch. Compare this reading to the battery terminal voltage. A significant voltage drop indicates a problem with the switch or its connections. | The voltage should be similar on both sides if the switch is functioning correctly. A large difference points to a faulty switch or connection. |
Repairing Battery Switch Issues
Repair procedures vary depending on the specific problem.
Cleaning Corrosion
Illustration: Imagine a close-up view of a corroded battery terminal. The terminal is covered in a layer of greenish-white corrosion. A wire brush is shown next to it, ready to be used. A spray bottle containing a battery terminal cleaner is also visible.
Description: First, disconnect the battery cables. Use a wire brush to thoroughly clean the corrosion from the battery terminals and the switch terminals. Then, spray a battery terminal cleaner on the terminals and let it sit for a few minutes before wiping clean with a cloth. Reconnect the cables, ensuring they are tightly secured.
Tightening Loose Connections
Illustration: The image shows a close-up of a loose battery cable clamp on a battery terminal. The clamp is slightly open, not making full contact. A wrench is shown next to the clamp, ready to tighten it.
Description: If the connections are loose, use the appropriate wrench to tighten the clamps on both the battery terminals and the switch terminals. Ensure a solid, secure connection. If the clamps are damaged, replace them.
Replacing the Battery Switch
Illustration: The illustration shows a travel trailer battery switch. Arrows point to the incoming and outgoing battery cables, and to the mounting screws holding the switch in place. A new battery switch is shown next to the old one.
Description: Disconnect the battery cables from the old switch. Unscrew the switch from its mounting bracket. Install the new switch in the same location, ensuring the terminals align correctly. Connect the battery cables to the new switch, tightening the clamps securely.
So, you’re planning a trip? Awesome! Don’t forget travel insurance! Check out Aon travel insurance for options covering everything from lost luggage to medical emergencies. They’ve got solid plans, and comparing them to other providers like Aon travel insurance (found on a different site!) is a good idea to find the best fit for your adventure.
Seriously, peace of mind is worth the price; get insured before you go!
Battery Switch and Power System Integration: Battery Switch On Travel Trailer Function
Your travel trailer’s battery switch isn’t just a simple on/off switch; it’s a crucial component that manages the flow of power throughout your entire electrical system. Understanding how it interacts with other parts like solar panels, the converter, and the inverter is key to maximizing your RV’s power efficiency and preventing problems. This section details how your battery switch orchestrates the power flow, ensuring your appliances run smoothly and your batteries are charged effectively.The battery switch acts as a central control point, directing power from various sources to different parts of your trailer.
It allows you to choose which power source (shore power, generator, solar, or batteries) feeds your 12V and 120V systems, or to isolate the batteries completely for safety. This prevents accidental draining of your batteries and safeguards sensitive electronics. Proper management of power flow is critical for extending the life of your batteries and avoiding costly repairs.
Power Flow Through the Battery Switch, Battery switch on travel trailer function
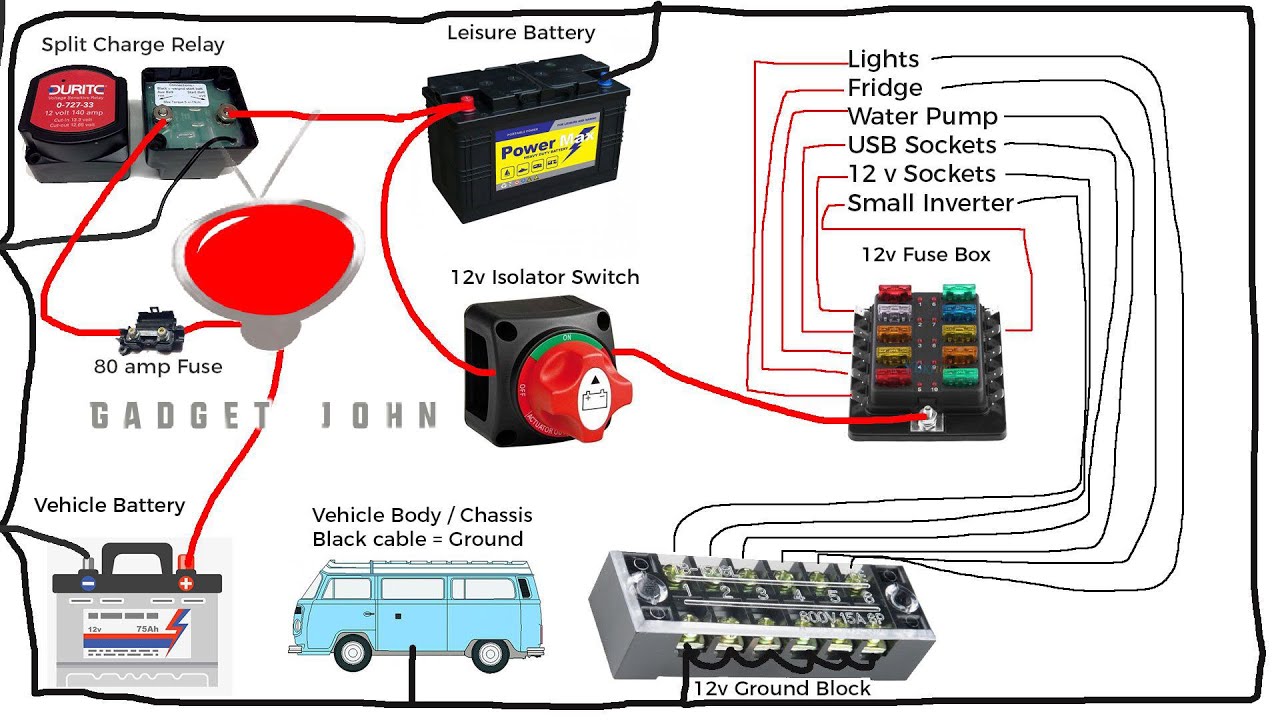
Imagine a simplified diagram: Shore power connects to the converter, which converts 120V AC to 12V DC to charge the batteries. The converter also supplies 12V DC to your 12V appliances. Solar panels also charge the batteries. An inverter converts 12V DC from the batteries to 120V AC for your 120V appliances. The battery switch sits in the middle, controlling the flow of power from each source to the batteries and to the 12V and 120V systems.
When the switch is in the “battery” position, power flows directly from the batteries to the 12V system. When in the “off” position, all power is cut to prevent battery drain. In the “on” position, it allows charging from shore power or solar. If you have a combined battery and start switch, the starting battery is always available to the starter motor, regardless of the switch position.
Battery Switch Configurations and Their Impact on Efficiency
Different battery switches offer varying levels of control and complexity. A simple single-battery switch simply connects or disconnects the battery from the system. A dual-battery switch allows you to select either battery, or both, for power distribution. More advanced switches offer additional features like a combined battery and start switch, which is particularly useful for larger trailers or those with multiple battery banks.
These more sophisticated switches can improve efficiency by optimizing power usage and preventing unnecessary drain. For example, a dual-battery switch lets you use one battery for house power and the other for starting, extending the lifespan of your house batteries. A poorly designed or incorrectly installed switch can lead to reduced efficiency, potential overcharging, or even damage to your electrical components.
A properly selected and installed switch is a vital part of maintaining a well-functioning and efficient RV electrical system.
Mastering your travel trailer’s battery switch is a fundamental skill for any RV owner. By understanding the different types of switches, following safe connection practices, and performing regular maintenance, you can ensure a reliable power supply for all your onboard systems. Remember, preventative maintenance is key to avoiding costly repairs and maximizing the lifespan of your battery system.
Safe travels!
FAQ Guide
What happens if I leave my battery switch on all the time?
Leaving your battery switch on constantly can drain your batteries, especially if you have parasitic draws (small amounts of power being used even when the trailer is off). It’s best to turn it off when not using the trailer.
How often should I check my battery connections?
Inspect your battery connections at least every three months for corrosion or looseness. More frequent checks are recommended if you’re in a humid or salty environment.
Can I use a different type of battery switch than what came with my trailer?
Potentially, but it’s crucial to ensure the new switch is compatible with your trailer’s electrical system and amperage requirements. Consult an RV electrician if you’re unsure.
My battery switch is making a clicking sound. What’s wrong?
A clicking sound often indicates a faulty switch, a low battery voltage, or a problem with the wiring. Check your battery voltage and wiring before replacing the switch.
